文章目录
- 一、系统组件与普通组件解耦
- 二、Lifecycle 解耦 Activity 系统组件与 UI 组件
- 1、传统实现方式
- ① Activity 系统组件
- ② 布局文件
- ③ 执行效果
- 2、LifeCycle 实现方式
- ① 自定义 UI 组件
- ② Activity 系统组件
- ③ 布局组件
- ④ 执行效果
- 三、LifecycleService 解耦 Service 与 UI 组件
- 1、构建脚本导入依赖
- 2、Android Studio 中搜索并添加依赖
- 3、布局文件属性排序
- 4、代码实现
- ① LifecycleService 组件
- ② LifecycleObserver 业务逻辑
- ③ AndroidManifest.xml 清单文件
- ④ Activity 系统组件
- ⑤ Activity 组件对应的布局文件
- ⑥ 执行结果
- 四、ProcessLifecycleOwner 监听整个应用程序的 Activity 生命周期
- 1、ProcessLifecycleOwner 说明
- 2、代码实现
- ① LifecycleObserver 组件
- ② 自定义 Application
- ③ AndroidManifest.xml 清单文件配置
- ④ 执行效果
一、系统组件与普通组件解耦
在 Android 应用开发过程中 , 普通组件 如 UI 控件 , 需要 与 Android 组件 的 生命周期函数相关联 , 当 Android 组件生命周期 发生改变时 , 可以 通知 普通组件 执行某种操作 ;
如 : 显示的自定义 UI 组件 , 要随着 Activity 组件生命周期的变化 , 进行相应改变 , 当 界面被覆盖 也就是 onPause 时 执行某种改变 , 当界面进入后台 onStop 时 , 执行某种改变 ;
在 Android 应用系统架构 中 , 总是希望 Android 组件 越小越好 , 不要把 Activity , Service 等组件写的很大 , 将 系统组件 与 实际的业务逻辑组件 进行分离 ;
上述操作 , 就是将 系统组件 与 普通组件 进行 解耦 , 降低代码复杂度 , 提高程序的可读性 , 可维护性 ;
Lifecycle 架构组件 就是实现上述 解耦功能 ;
Lifecycle 的适用场景 :
- 建立 可感知 系统组件 生命周期 的 自定义 UI 组件 , 如 创建 自定义组件 , 可以直接在组件内部处理 Activity 生命周期的 回调 , 不需要在 Activity 组件中开发大量的 自定义组件 相关的业务逻辑 ;
- 使用了 Lifecycle 的 组件 , 组件可移植性增强 , 在组件内部 增加了 对 系统组件 生命周期的处理 , 该组件可以任意移植 , 不需要在 Activity 中开发额外的代码 ;
支持 Lifecycle 架构组件 的 Android 系统组件 :
- Activity
- Fragment
- Service
- Application
二、Lifecycle 解耦 Activity 系统组件与 UI 组件
在上一个章节 , 讲到 将 系统组件 与 普通组件 进行 解耦 , Activity 组件就是 系统组件 , 在 Activity 中使用到的 UI 组件 , 就是实际实现业务逻辑的 普通组件 ;
实现一个功能 : 监控页面的打开时间 , 将页面打开时间直接显示在页面中 ;
1、传统实现方式
使用传统方式 , UI 组件 直接定义在了 Activity 系统组件 中 , 二者耦合性太高 , 不利于项目维护 ;
UI 组件的业务逻辑 与 Activity 系统组件 绑定程度很高 , 并且 UI 组件的逻辑 与 Activity 生命周期关联程度很高 ;
① Activity 系统组件
package kim.hsl.lifecycle

import androidx.appcompat.app.AppCompatActivity
import android.os.Bundle
import android.widget.Chronometer

class MainActivity : AppCompatActivity() {

    /**
     * UI 组件的业务逻辑 与 Activity 系统组件 绑定程度很高
     * 并且 UI 组件的逻辑 与 Activity 生命周期关联程度很高
     */
    lateinit var chronometer: Chronometer

    override fun onCreate(savedInstanceState: Bundle?) {
        super.onCreate(savedInstanceState)
        setContentView(R.layout.activity_main)
        chronometer = findViewById(R.id.chronometer)
    }

    override fun onResume() {
        super.onResume()
        chronometer.start()
    }

    override fun onPause() {
        super.onPause()
        chronometer.stop()
    }
}
- 1
- 2
- 3
- 4
- 5
- 6
- 7
- 8
- 9
- 10
- 11
- 12
- 13
- 14
- 15
- 16
- 17
- 18
- 19
- 20
- 21
- 22
- 23
- 24
- 25
- 26
- 27
- 28
- 29
- 30
② 布局文件
<?xml version="1.0" encoding="utf-8"?>
<androidx.constraintlayout.widget.ConstraintLayout
    xmlns:android="http://schemas.android.com/apk/res/android"
    xmlns:app="http://schemas.android.com/apk/res-auto"
    xmlns:tools="http://schemas.android.com/tools"
    android:layout_width="match_parent"
    android:layout_height="match_parent"
    tools:context=".MainActivity">

    <Chronometer
        android:id="@+id/chronometer"
        android:layout_width="wrap_content"
        android:layout_height="wrap_content"
        app:layout_constraintBottom_toBottomOf="parent"
        app:layout_constraintEnd_toEndOf="parent"
        app:layout_constraintStart_toStartOf="parent"
        app:layout_constraintTop_toTopOf="parent" />

</androidx.constraintlayout.widget.ConstraintLayout>
- 1
- 2
- 3
- 4
- 5
- 6
- 7
- 8
- 9
- 10
- 11
- 12
- 13
- 14
- 15
- 16
- 17
- 18
- 19
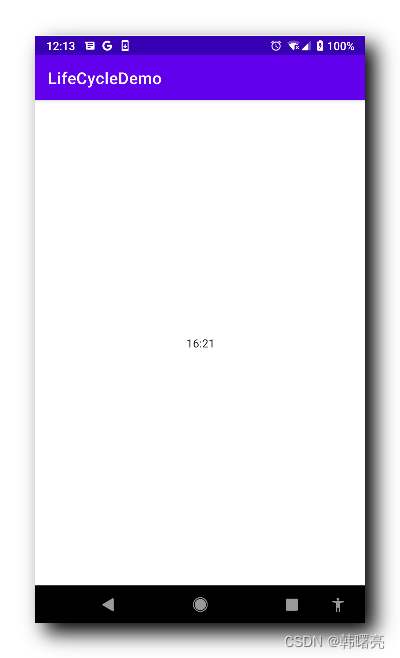
③ 执行效果
2、LifeCycle 实现方式
自定义 UI 组件 中 实现 LifeCycleObserver 接口 , 再将 该 自定义组件 与 Activity 组件 绑定 , 那么 Activity 的生命周期函数回调时 , 会 自动触发回调 LifeCycleObserver 接口函数 ;
这种实现方式 , 解耦 了 UI 组件 与 Android 系统组件 ;
① 自定义 UI 组件
在下面的自定义组件中 , 实现了 LifecycleObserver 接口 , 在 Activity 中 , 调用 LifeCycle#addObserver 函数 , 为该 自定义组件添加 生命周期回调 ;
package kim.hsl.lifecycle

import android.content.Context
import android.os.Build
import android.util.AttributeSet
import android.widget.Chronometer
import androidx.annotation.RequiresApi
import androidx.lifecycle.Lifecycle
import androidx.lifecycle.LifecycleObserver
import androidx.lifecycle.OnLifecycleEvent

class MyChronometer: Chronometer, LifecycleObserver {

    constructor(context: Context?): super(context)
    constructor(context: Context?, attrs: AttributeSet?): super(context, attrs)
    constructor(context: Context?, attrs: AttributeSet?, defStyleAttr: Int):
            super(context, attrs, defStyleAttr)
    @RequiresApi(Build.VERSION_CODES.LOLLIPOP)
    constructor(context: Context?, attrs: AttributeSet?, defStyleAttr: Int, defStyleRes: Int):
            super(context, attrs, defStyleAttr, defStyleRes)

    @OnLifecycleEvent(Lifecycle.Event.ON_RESUME)
    fun startMeter() {
        // 开始计时
        this.start()
    }

    @OnLifecycleEvent(Lifecycle.Event.ON_PAUSE)
    fun stopMeter() {
        // 停止计时
        this.stop()
    }
}
- 1
- 2
- 3
- 4
- 5
- 6
- 7
- 8
- 9
- 10
- 11
- 12
- 13
- 14
- 15
- 16
- 17
- 18
- 19
- 20
- 21
- 22
- 23
- 24
- 25
- 26
- 27
- 28
- 29
- 30
- 31
- 32
- 33
② Activity 系统组件
在 Activity 中 , 先通过 getLifecycle() 函数 获取 LifeCycle 实例 , 然后调用 Lifecycle#addObserver 函数 , 为 自定义 UI 组件 添加 生命周期回调 ;
package kim.hsl.lifecycle

import android.os.Bundle
import androidx.appcompat.app.AppCompatActivity

class MainActivity : AppCompatActivity() {

    lateinit var chronometer: MyChronometer

    override fun onCreate(savedInstanceState: Bundle?) {
        super.onCreate(savedInstanceState)
        setContentView(R.layout.activity_main)

        chronometer = findViewById(R.id.chronometer)
        // 为自定义组件 MyChronometer 添加 Activity 生命周期回调方法
        lifecycle.addObserver(chronometer)
    }
}
- 1
- 2
- 3
- 4
- 5
- 6
- 7
- 8
- 9
- 10
- 11
- 12
- 13
- 14
- 15
- 16
- 17
- 18
③ 布局组件
布局中使用的是 实现了 LifeCycleObserver 接口的 自定义 UI 组件 ;
<?xml version="1.0" encoding="utf-8"?>
<androidx.constraintlayout.widget.ConstraintLayout
    xmlns:android="http://schemas.android.com/apk/res/android"
    xmlns:app="http://schemas.android.com/apk/res-auto"
    xmlns:tools="http://schemas.android.com/tools"
    android:layout_width="match_parent"
    android:layout_height="match_parent"
    tools:context=".MainActivity">

    <kim.hsl.lifecycle.MyChronometer
        android:id="@+id/chronometer"
        android:layout_width="wrap_content"
        android:layout_height="wrap_content"
        app:layout_constraintBottom_toBottomOf="parent"
        app:layout_constraintEnd_toEndOf="parent"
        app:layout_constraintStart_toStartOf="parent"
        app:layout_constraintTop_toTopOf="parent" />

</androidx.constraintlayout.widget.ConstraintLayout>
- 1
- 2
- 3
- 4
- 5
- 6
- 7
- 8
- 9
- 10
- 11
- 12
- 13
- 14
- 15
- 16
- 17
- 18
- 19
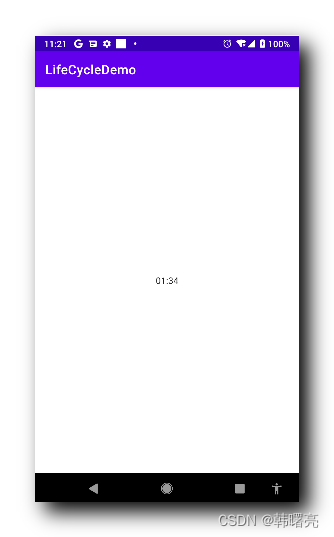
④ 执行效果
三、LifecycleService 解耦 Service 与 UI 组件
1、构建脚本导入依赖
要使用 Lifecycle , 需要导入 androidx.lifecycle:lifecycle-extensions:2.2.0 依赖库 , 在 build.gradle 构建脚本 中 , 导入依赖 ;
dependencies {
    implementation 'androidx.lifecycle:lifecycle-extensions:2.2.0'
}
- 1
- 2
- 3
2、Android Studio 中搜索并添加依赖
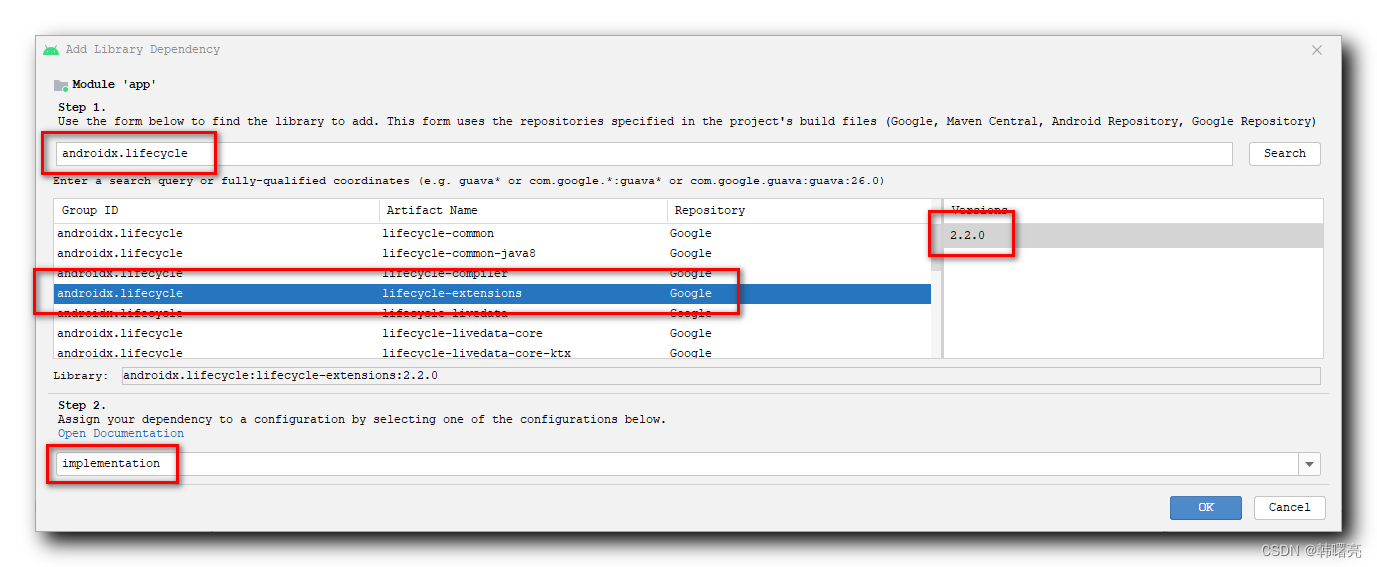
如果 不知道依赖库的具体路径 , 可以使用 Android Studio 的依赖库搜索功能 ;
搜索并添加依赖步骤 :
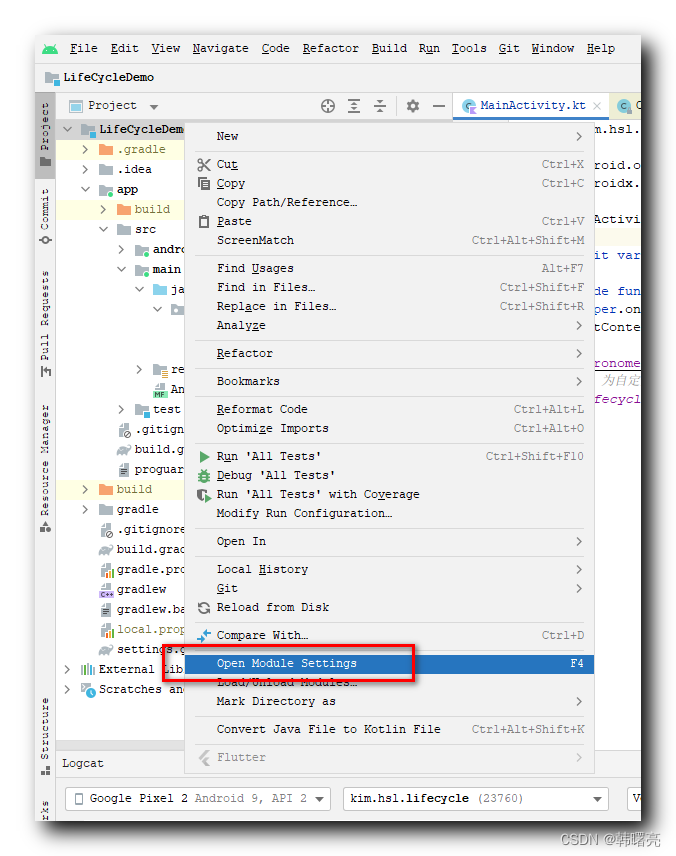
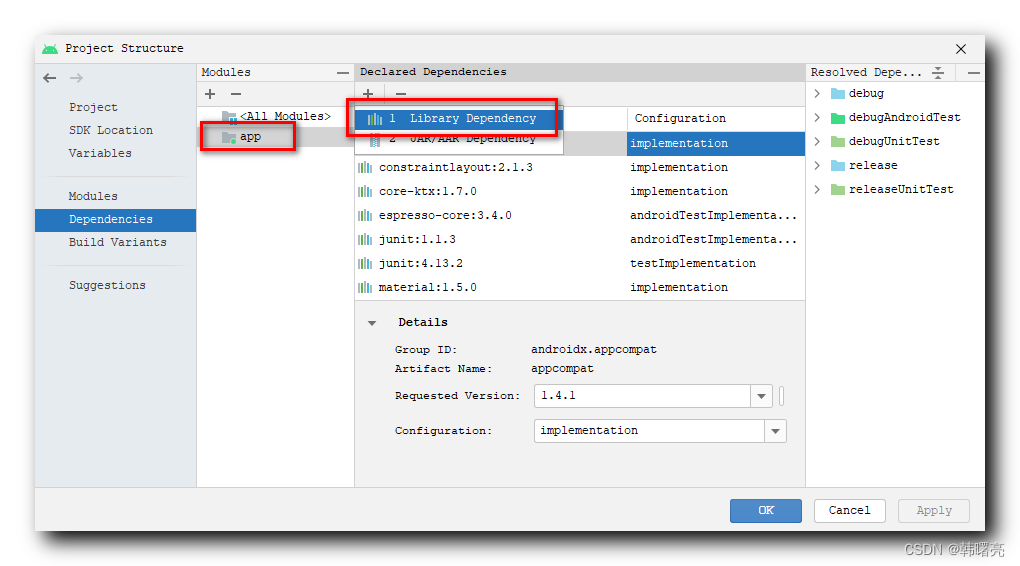
右键点击工程根目录 , 在弹出的菜单中选择 " Open Module Settings " 选项 , 或者直接使用 F4 快捷键 ,
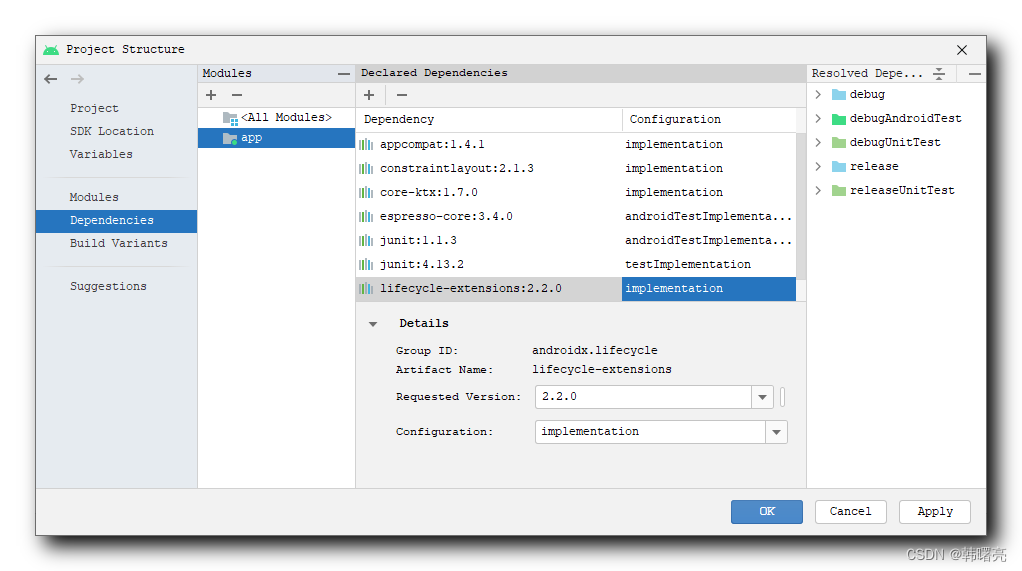
在弹出的 " Project Structure " 对话框中 , 左侧选择 " Dependencies " 面板 , 点击右侧的 " Add Dependency " 按钮 ,
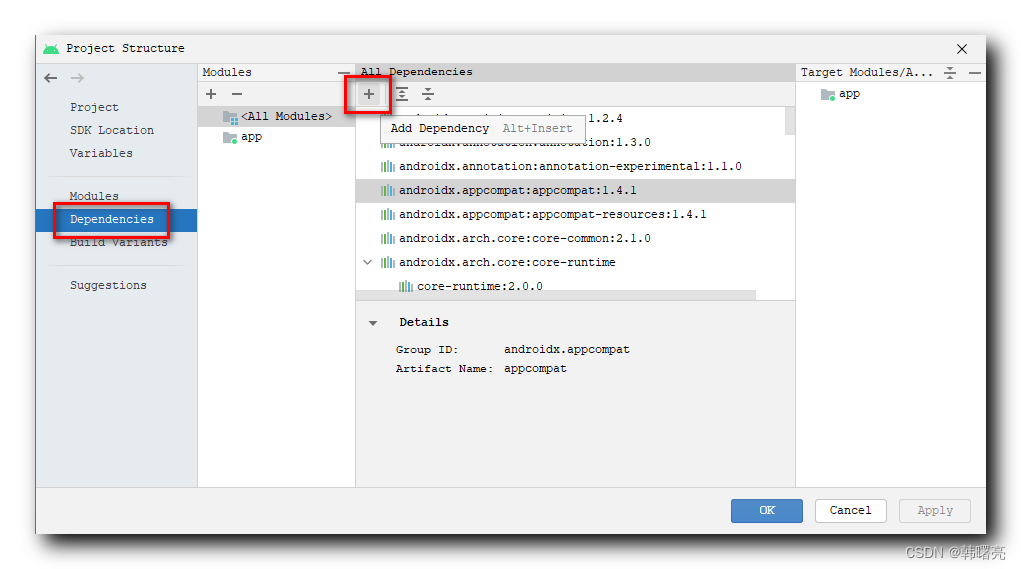
在中间的 Modules 面板中 , 选择要添加依赖的 Module , 然后右侧选择 添加 " Library Dependency " 选项 ,
在弹出的 " Add Library Dependency " 对话框中 , 搜索 " androidx.lifecycle " , 找到要导入的依赖库 , 选择依赖库版本 , 即可导入该依赖库 ;
选择完毕后 , 点击 应用按钮 ,
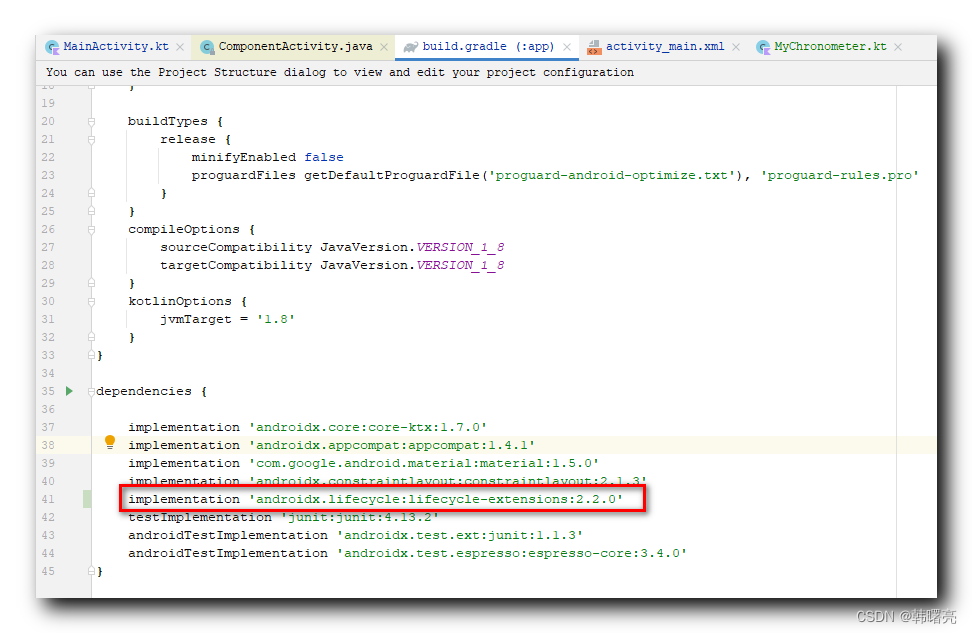
在 build.gradle 构建脚本 中 , 会自动插入该依赖 ;
dependencies {
    implementation 'androidx.lifecycle:lifecycle-extensions:2.2.0'
}
- 1
- 2
- 3
3、布局文件属性排序
写完 布局文件后 , 可以选择 " 菜单栏 | Code | Rearrange Code " , 可以对布局文件中的 组件 属性进行排序 , 一般会按照 ID , 布局宽高属性 , 布局内容属性 , 布局的位置属性 进行排序 , 提高代码的可读性 ;

4、代码实现
① LifecycleService 组件
LifecycleService 组件 是 Service 组件类 的子类 , 一般使用 自定义类继承 LifecycleService 类 ;
在 自定义 LifecycleService 类中 , 需要创建 LifeCycleObserver 实例对象 , 该对象中定义了实际的业务逻辑 ;
传统 代码行为 , 一般 直接在 Service 系统组件中 直接 定义 普通的业务逻辑组件 , 导致 系统组件 与 普通组件 耦合性很高 ;
引入了 LifeCycle 架构组件 后 , LifecycleService 组件 与 LifeCycleObserver 绑定 , LifeCycleObserver 实例对象 就对应了 普通的业务逻辑组件 , 在 该对象中 有对应的 Service 生命周期回调 ;
这就实现了 系统组件 与 普通组件 的解耦 ;
代码示例 :
package kim.hsl.lifecycle

import android.util.Log
import androidx.lifecycle.LifecycleService

/**
 * Android 系统组件
 */
class MyLifecycleService: LifecycleService {
    constructor(){
        Log.i("LifeCycleDemo", "MyService Init")

        // 为 Service 添加 生命周期回调
        // 解耦 Service 系统组件 与 普通逻辑组件
        var myLifeCycleObserver = MyLifeCycleObserver()
        lifecycle.addObserver(myLifeCycleObserver)
    }
}
- 1
- 2
- 3
- 4
- 5
- 6
- 7
- 8
- 9
- 10
- 11
- 12
- 13
- 14
- 15
- 16
- 17
- 18
② LifecycleObserver 业务逻辑
LifecycleObserver 中定义了实际的业务逻辑 , 对应着 普通组件 , 在 LifecycleService 中 , 没有业务相关代码 , 借此实现了 系统组件 与 普通组件 的 解耦 操作 ;
在函数上添加
@OnLifecycleEvent(Lifecycle.Event.ON_CREATE)
- 1
注解 , 在 LifecycleService 中执行 onCreate 生命周期函数时 , 就会回调该方法 ;
在函数上添加
@OnLifecycleEvent(Lifecycle.Event.ON_DESTROY)
- 1
注解 , 在 LifecycleService 中执行 onDestroy 生命周期函数时 , 就会回调该函数 ;
LifecycleObserver 业务逻辑代码 :
package kim.hsl.lifecycle

import android.util.Log
import androidx.lifecycle.Lifecycle
import androidx.lifecycle.LifecycleObserver
import androidx.lifecycle.OnLifecycleEvent

class MyLifeCycleObserver: LifecycleObserver {
    @OnLifecycleEvent(Lifecycle.Event.ON_CREATE)
    fun serviceStart(){
        // 服务启动
        Log.i("LifeCycleDemo", "MyService ON_CREATE")
    }

    @OnLifecycleEvent(Lifecycle.Event.ON_DESTROY)
    fun serviceStop(){
        // 服务停止
        Log.i("LifeCycleDemo", "MyService ON_DESTROY")
    }
}
- 1
- 2
- 3
- 4
- 5
- 6
- 7
- 8
- 9
- 10
- 11
- 12
- 13
- 14
- 15
- 16
- 17
- 18
- 19
- 20
③ AndroidManifest.xml 清单文件
主要是 在 清单文件中配置 自定义的 LifecycleService 类 ;
<service android:name="kim.hsl.lifecycle.MyLifecycleService" />
- 1
清单文件配置 :
<?xml version="1.0" encoding="utf-8"?>
<manifest xmlns:android="http://schemas.android.com/apk/res/android"
    xmlns:tools="http://schemas.android.com/tools">

    <application
        android:allowBackup="true"
        android:dataExtractionRules="@xml/data_extraction_rules"
        android:fullBackupContent="@xml/backup_rules"
        android:icon="@mipmap/ic_launcher"
        android:label="@string/app_name"
        android:roundIcon="@mipmap/ic_launcher_round"
        android:supportsRtl="true"
        android:theme="@style/Theme.LifeCycleDemo"
        tools:targetApi="31">
        <activity
            android:name=".MainActivity"
            android:exported="true">
            <intent-filter>
                <action android:name="android.intent.action.MAIN" />

                <category android:name="android.intent.category.LAUNCHER" />
            </intent-filter>

            <meta-data
                android:name="android.app.lib_name"
                android:value="" />
        </activity>

        <service android:name="kim.hsl.lifecycle.MyLifecycleService" />
    </application>

</manifest>
- 1
- 2
- 3
- 4
- 5
- 6
- 7
- 8
- 9
- 10
- 11
- 12
- 13
- 14
- 15
- 16
- 17
- 18
- 19
- 20
- 21
- 22
- 23
- 24
- 25
- 26
- 27
- 28
- 29
- 30
- 31
- 32
④ Activity 系统组件
在 Activity 系统组件中 , 主要实现 自定义的 LifecycleService 的启动和停止操作 ;
启动服务 :
startService(Intent(this, MyLifecycleService::class.java))
- 1
停止服务 :
stopService(Intent(this, MyLifecycleService::class.java))
- 1
Activity 系统组件代码 :
package kim.hsl.lifecycle

import android.content.Intent
import android.os.Bundle
import android.view.View
import androidx.appcompat.app.AppCompatActivity

class MainActivity : AppCompatActivity() {

    override fun onCreate(savedInstanceState: Bundle?) {
        super.onCreate(savedInstanceState)
        setContentView(R.layout.activity_main)
    }

    fun startLifeCycleService(view: View) {
        startService(Intent(this, MyLifecycleService::class.java))
    }
    fun stopLifeCycleService(view: View) {
        stopService(Intent(this, MyLifecycleService::class.java))
    }
}
- 1
- 2
- 3
- 4
- 5
- 6
- 7
- 8
- 9
- 10
- 11
- 12
- 13
- 14
- 15
- 16
- 17
- 18
- 19
- 20
- 21
⑤ Activity 组件对应的布局文件
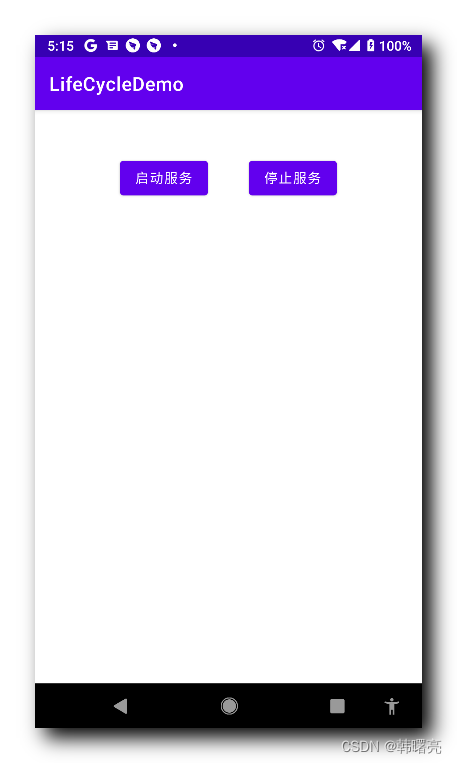
在该布局文件中 , 主要设置两个按钮 , 分别用于 启动服务 和 停止服务 ;
布局文件源码 :
<?xml version="1.0" encoding="utf-8"?>
<androidx.constraintlayout.widget.ConstraintLayout
    xmlns:android="http://schemas.android.com/apk/res/android"
    xmlns:app="http://schemas.android.com/apk/res-auto"
    xmlns:tools="http://schemas.android.com/tools"
    android:layout_width="match_parent"
    android:layout_height="match_parent"
    tools:context=".MainActivity">

    <Button
        android:id="@+id/start_service"
        android:layout_width="wrap_content"
        android:layout_height="wrap_content"
        android:text="启动服务"
        android:onClick="startLifeCycleService"
        app:layout_constraintBottom_toBottomOf="parent"
        app:layout_constraintEnd_toEndOf="parent"
        app:layout_constraintHorizontal_bias="0.283"
        app:layout_constraintStart_toStartOf="parent"
        app:layout_constraintTop_toTopOf="parent"
        app:layout_constraintVertical_bias="0.086" />

    <Button
        android:id="@+id/stop_service"
        android:layout_width="wrap_content"
        android:layout_height="wrap_content"
        android:text="停止服务"
        android:onClick="stopLifeCycleService"
        app:layout_constraintBottom_toBottomOf="parent"
        app:layout_constraintEnd_toEndOf="parent"
        app:layout_constraintHorizontal_bias="0.709"
        app:layout_constraintStart_toStartOf="parent"
        app:layout_constraintTop_toTopOf="parent"
        app:layout_constraintVertical_bias="0.086" />

</androidx.constraintlayout.widget.ConstraintLayout>
- 1
- 2
- 3
- 4
- 5
- 6
- 7
- 8
- 9
- 10
- 11
- 12
- 13
- 14
- 15
- 16
- 17
- 18
- 19
- 20
- 21
- 22
- 23
- 24
- 25
- 26
- 27
- 28
- 29
- 30
- 31
- 32
- 33
- 34
- 35
- 36
⑥ 执行结果
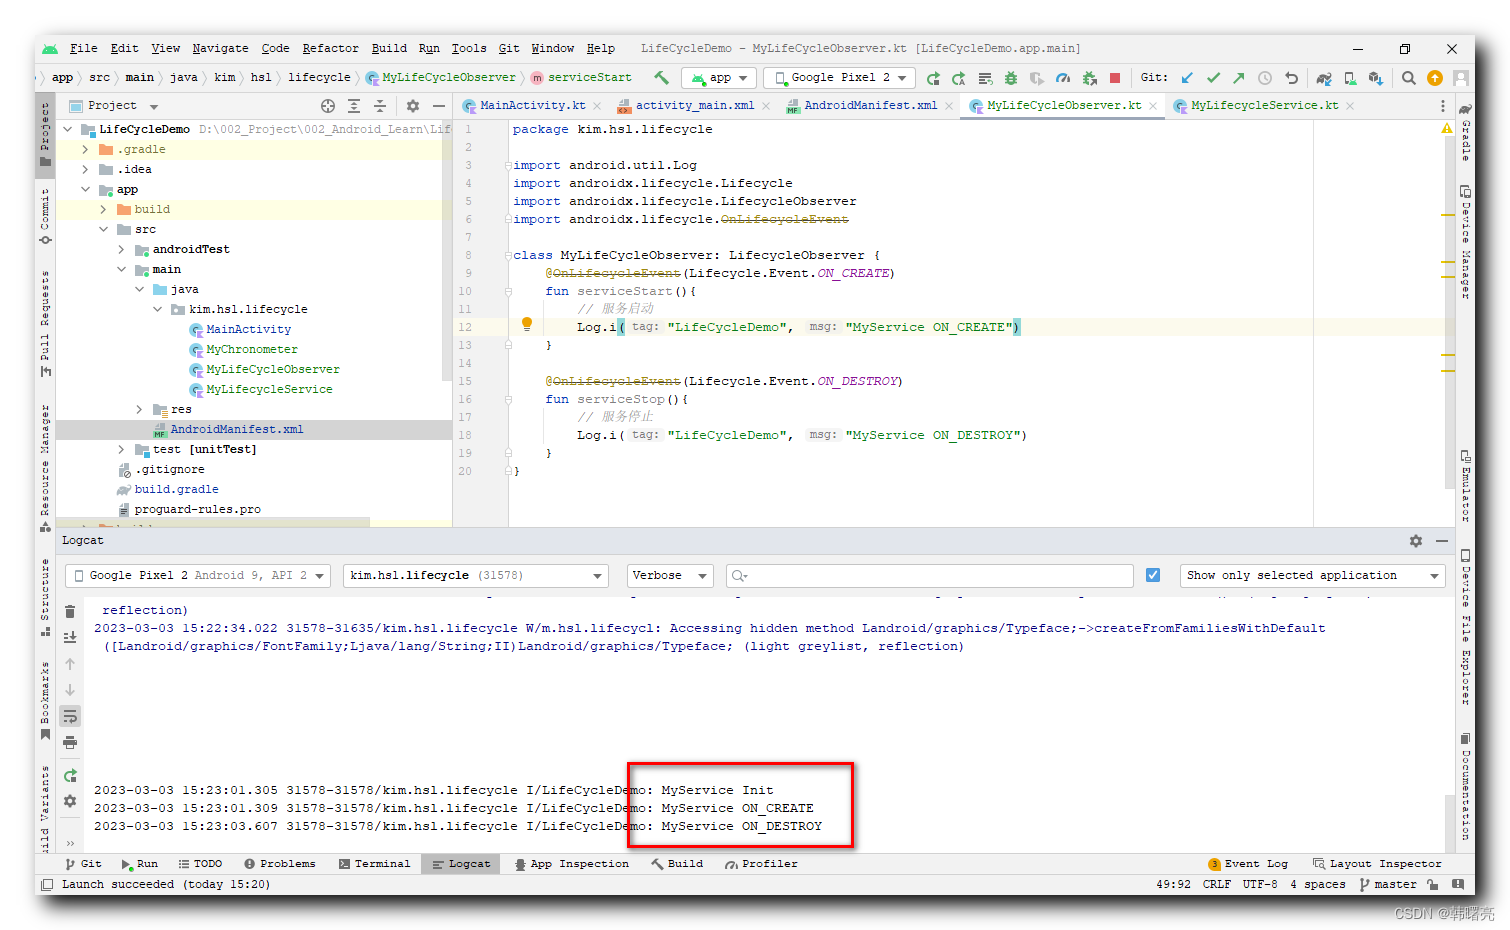
执行后 , 先点击 " 启动服务 " 按钮 , 然后点击 " 停止服务 " 按钮 ;
点击 启动服务 按钮后 , 输出日志 :
2023-03-03 15:23:01.305 31578-31578/kim.hsl.lifecycle I/LifeCycleDemo: MyService Init
2023-03-03 15:23:01.309 31578-31578/kim.hsl.lifecycle I/LifeCycleDemo: MyService ON_CREATE
- 1
- 2
点击 停止服务 按钮后 , 输出日志 :
2023-03-03 15:23:03.607 31578-31578/kim.hsl.lifecycle I/LifeCycleDemo: MyService ON_DESTROY
- 1
完整日志输出 :
2023-03-03 15:23:01.305 31578-31578/kim.hsl.lifecycle I/LifeCycleDemo: MyService Init
2023-03-03 15:23:01.309 31578-31578/kim.hsl.lifecycle I/LifeCycleDemo: MyService ON_CREATE
2023-03-03 15:23:03.607 31578-31578/kim.hsl.lifecycle I/LifeCycleDemo: MyService ON_DESTROY
- 1
- 2
- 3
四、ProcessLifecycleOwner 监听整个应用程序的 Activity 生命周期
1、ProcessLifecycleOwner 说明
在 Android 应用的 Application 中 , 使用 ProcessLifeCycleOwner 可以监听 应用程序 的 生命周期 ;
ProcessLifeCycleOwner 监听的是 整个 Android 应用程序 的 Activity 生命周期 , 该监听与 Activity 数量无关 ;
在 LifecycleObserver 中 , Lifecycle.Event.ON_CREATE 注解修饰的 函数 只会被 调用一次 , 只要有一个 Activity 存在 , 就不会触发 Lifecycle.Event.ON_DESTROY , 所有的 Activity 都退出 , 就意味着 应用 退出 , 进程直接消亡 , 因此 Lifecycle.Event.ON_DESTROY 注解修饰的函数 永远都 不会被触发 ;
2、代码实现
① LifecycleObserver 组件
自定义 LifecycleObserver 组件 , 用于监听 整个应用的 Activity , 当 Activity 调用对应生命周期函数时 , 会自动回调该组件内的相应回调 ;
代码示例 :
package kim.hsl.lifecycle

import android.util.Log
import androidx.lifecycle.Lifecycle
import androidx.lifecycle.LifecycleObserver
import androidx.lifecycle.OnLifecycleEvent

class MyLifeCycleObserver: LifecycleObserver {
    val TAG = "LifecycleDemo"

    @OnLifecycleEvent(Lifecycle.Event.ON_CREATE)
    fun onCreate() {
        Log.i(TAG, "Lifecycle.Event.ON_CREATE")
    }

    @OnLifecycleEvent(Lifecycle.Event.ON_START)
    fun onStart() {
        Log.i(TAG, "Lifecycle.Event.ON_START")
    }

    @OnLifecycleEvent(Lifecycle.Event.ON_RESUME)
    fun onResume() {
        Log.i(TAG, "Lifecycle.Event.ON_RESUME")
    }

    @OnLifecycleEvent(Lifecycle.Event.ON_PAUSE)
    fun onPause() {
        Log.i(TAG, "Lifecycle.Event.ON_PAUSE")
    }

    @OnLifecycleEvent(Lifecycle.Event.ON_STOP)
    fun onStop() {
        Log.i(TAG, "Lifecycle.Event.ON_STOP")
    }

    @OnLifecycleEvent(Lifecycle.Event.ON_DESTROY)
    fun onDestroy() {
        Log.i(TAG, "Lifecycle.Event.ON_DESTROY")
    }
}
- 1
- 2
- 3
- 4
- 5
- 6
- 7
- 8
- 9
- 10
- 11
- 12
- 13
- 14
- 15
- 16
- 17
- 18
- 19
- 20
- 21
- 22
- 23
- 24
- 25
- 26
- 27
- 28
- 29
- 30
- 31
- 32
- 33
- 34
- 35
- 36
- 37
- 38
- 39
- 40
② 自定义 Application
在该 自定义 Application 类中 , 调用 ProcessLifecycleOwner#getLifecycle#addObserver 函数 , 为整个应用的 Activity 组件添加监听 ;
核心代码 :
        ProcessLifecycleOwner
            .get()
            .lifecycle
            .addObserver(MyLifeCycleObserver())
- 1
- 2
- 3
- 4
完整代码 :
package kim.hsl.lifecycle

import android.app.Application
import androidx.lifecycle.ProcessLifecycleOwner

class MyApplication: Application() {
    override fun onCreate() {
        super.onCreate()

        ProcessLifecycleOwner
            .get()
            .lifecycle
            .addObserver(MyLifeCycleObserver())
    }
}
- 1
- 2
- 3
- 4
- 5
- 6
- 7
- 8
- 9
- 10
- 11
- 12
- 13
- 14
- 15
③ AndroidManifest.xml 清单文件配置
在清单文件中 , 设置自定义的 MyApplication , 为 application 节点添加
android:name=".MyApplication"
- 1
属性 ;
完整代码 :
<?xml version="1.0" encoding="utf-8"?>
<manifest xmlns:android="http://schemas.android.com/apk/res/android"
    xmlns:tools="http://schemas.android.com/tools">

    <application
        android:name=".MyApplication"
        android:allowBackup="true"
        android:dataExtractionRules="@xml/data_extraction_rules"
        android:fullBackupContent="@xml/backup_rules"
        android:icon="@mipmap/ic_launcher"
        android:label="@string/app_name"
        android:roundIcon="@mipmap/ic_launcher_round"
        android:supportsRtl="true"
        android:theme="@style/Theme.LifeCycleDemo"
        tools:targetApi="31">
        <activity
            android:name=".MainActivity"
            android:exported="true">
            <intent-filter>
                <action android:name="android.intent.action.MAIN" />

                <category android:name="android.intent.category.LAUNCHER" />
            </intent-filter>

            <meta-data
                android:name="android.app.lib_name"
                android:value="" />
        </activity>
    </application>

</manifest>
- 1
- 2
- 3
- 4
- 5
- 6
- 7
- 8
- 9
- 10
- 11
- 12
- 13
- 14
- 15
- 16
- 17
- 18
- 19
- 20
- 21
- 22
- 23
- 24
- 25
- 26
- 27
- 28
- 29
- 30
- 31
④ 执行效果
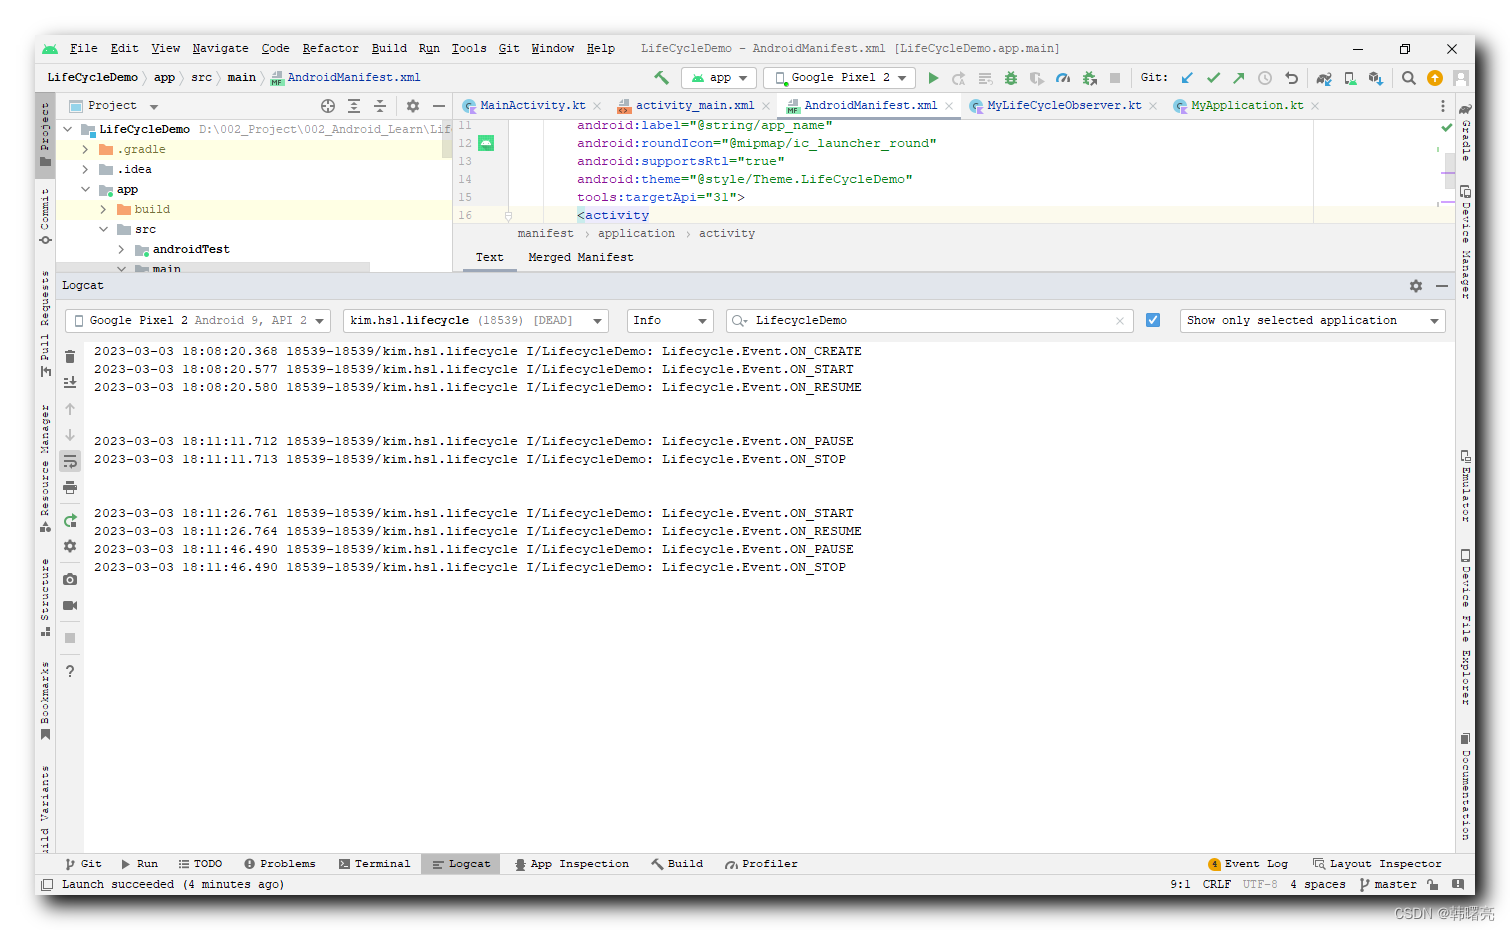
应用打开后 , 打印日志 :
2023-03-03 18:08:20.368 18539-18539/kim.hsl.lifecycle I/LifecycleDemo: Lifecycle.Event.ON_CREATE
2023-03-03 18:08:20.577 18539-18539/kim.hsl.lifecycle I/LifecycleDemo: Lifecycle.Event.ON_START
2023-03-03 18:08:20.580 18539-18539/kim.hsl.lifecycle I/LifecycleDemo: Lifecycle.Event.ON_RESUME
- 1
- 2
- 3
按下 Home 键 , 应用进入后台 , 打印日志 :
2023-03-03 18:11:11.712 18539-18539/kim.hsl.lifecycle I/LifecycleDemo: Lifecycle.Event.ON_PAUSE
2023-03-03 18:11:11.713 18539-18539/kim.hsl.lifecycle I/LifecycleDemo: Lifecycle.Event.ON_STOP
- 1
- 2
再次回到前台 , 打印日志 :
2023-03-03 18:11:26.761 18539-18539/kim.hsl.lifecycle I/LifecycleDemo: Lifecycle.Event.ON_START
2023-03-03 18:11:26.764 18539-18539/kim.hsl.lifecycle I/LifecycleDemo: Lifecycle.Event.ON_RESUME
- 1
- 2
杀掉进程 , 打印日志 :
2023-03-03 18:11:46.490 18539-18539/kim.hsl.lifecycle I/LifecycleDemo: Lifecycle.Event.ON_PAUSE
2023-03-03 18:11:46.490 18539-18539/kim.hsl.lifecycle I/LifecycleDemo: Lifecycle.Event.ON_STOP
- 1
- 2
完整日志信息 :
2023-03-03 18:08:20.368 18539-18539/kim.hsl.lifecycle I/LifecycleDemo: Lifecycle.Event.ON_CREATE
2023-03-03 18:08:20.577 18539-18539/kim.hsl.lifecycle I/LifecycleDemo: Lifecycle.Event.ON_START
2023-03-03 18:08:20.580 18539-18539/kim.hsl.lifecycle I/LifecycleDemo: Lifecycle.Event.ON_RESUME


2023-03-03 18:11:11.712 18539-18539/kim.hsl.lifecycle I/LifecycleDemo: Lifecycle.Event.ON_PAUSE
2023-03-03 18:11:11.713 18539-18539/kim.hsl.lifecycle I/LifecycleDemo: Lifecycle.Event.ON_STOP


2023-03-03 18:11:26.761 18539-18539/kim.hsl.lifecycle I/LifecycleDemo: Lifecycle.Event.ON_START
2023-03-03 18:11:26.764 18539-18539/kim.hsl.lifecycle I/LifecycleDemo: Lifecycle.Event.ON_RESUME

2023-03-03 18:11:46.490 18539-18539/kim.hsl.lifecycle I/LifecycleDemo: Lifecycle.Event.ON_PAUSE
2023-03-03 18:11:46.490 18539-18539/kim.hsl.lifecycle I/LifecycleDemo: Lifecycle.Event.ON_STOP
- 1
- 2
- 3
- 4
- 5
- 6
- 7
- 8
- 9
- 10
- 11
- 12
- 13
- 14
博客代码 : https://download.csdn.net/download/han1202012/87527626
